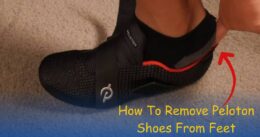
Ever get stuck trying to take off those Peloton shoes after a workout? Wondering if there’s a magic trick to it?
Well, good news! I’ve been on a mission to figure it out, spending a bunch of time digging into the ins and outs of Peloton shoe removal. I’ve been your shoe-removal detective, testing and trying until I cracked the code. So, if you’re keen on making your exit from the Peloton a breeze, stick around. I’m here to share the secrets I’ve uncovered and guide you through it all. Say goodbye to post-ride shoe struggles and hello to a smooth pedal victory dance! Ready to make your Peloton experience even better? Let’s dive in!
Importance of Proper Shoe Removal
Now, here’s the lowdown on why taking off your Peloton shoes is a big deal. It’s not just about avoiding a wrestling match with your feet. It’s about keeping these shoes in tip-top shape and making sure your post-ride feels are on point. Imagine if your shoes started falling apart or decided to pinch your toes in protest – not cool, right? So, stick with us as we spill the beans on the proper way to bid farewell to your Peloton shoes, keeping you comfy and your gear in happy, ride-ready condition.
Understanding Peloton Shoes
Unpacking Peloton Shoes: A Quick Overview
Let’s kick things off with a brief tour of Peloton shoes. These aren’t your everyday sneakers; they’re specially crafted for the high-energy world of Peloton workouts. Designed with precision, Peloton shoes boast a snug fit that’s all about maximizing your pedaling power. Think of them as your trusty sidekick, amplifying your cycling experience with every turn of the pedal.
A Sneak Peek Inside: Unique Features & Mechanisms
Now, let’s zoom in on what makes Peloton shoes stand out from the crowd. These aren’t just shoes; they’re equipped with specialized features and mechanisms that elevate your ride. The highlight? Cleats! Peloton shoes come with cleats that securely clip into the bike pedals, creating a synchronized dance between your feet and the bike. This unique system ensures optimal energy transfer, giving you that extra push to conquer your fitness goals. So, when we talk Peloton shoes, we’re talking about a dynamic duo of comfort and performance.
Why Removing Right Matters: The Comfort Connection
Alright, here’s the inside scoop on why the removal process is more than just a post-ride ritual. Imagine this: You’ve just powered through an intense cycling session, and now it’s time to unclip and unwind. Removing your Peloton shoes correctly isn’t just a courtesy to the shoes; it’s a key player in your post-ride comfort game. A proper removal ensures you part ways with your cycling companions without a struggle, avoiding potential discomfort or, worse, damage. It’s all about extending the life of your Peloton shoes and keeping your feet happy for many rides to come. So, buckle up for the how-to, because removing them right is the final act in the Peloton shoe love story.
Getting Ready for the Big Moment: Preparing for Shoe Removal
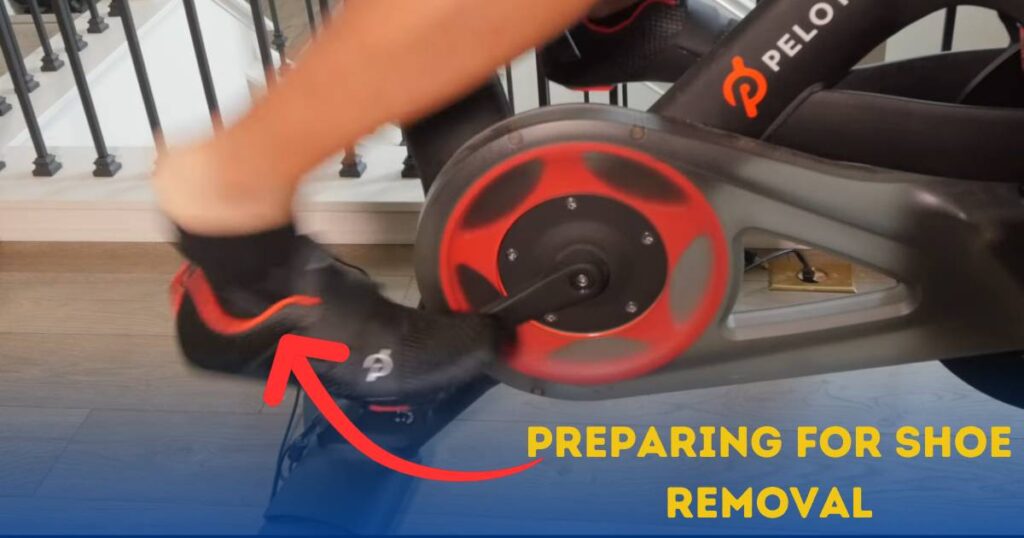
Before we jump into the thrilling act of removing those Peloton shoes, let’s talk preparation – because setting the stage right is half the battle.
Stability First: Find Your Ground
First things first, let’s talk stability. The last thing you want is a wobbly surface when you’re bidding farewell to your Peloton shoes. Find yourself a stable surface, be it the trusty living room floor or a designated workout space. Ensuring stability not only makes the removal process smoother but also adds an extra layer of safety. We’re aiming for a drama-free zone, so finding your ground is the first step to shoe-removal success.
Take a Load Off: The Chair Chronicles
Now, for the comfort enthusiasts out there – it’s chair time. Sitting down or using a chair for added support is a game-changer. Imagine it as the VIP section of your shoe-removal experience. It’s not just about comfort; it’s about giving yourself the best seat in the house for a stress-free process. So, grab a chair, take a seat, and get ready to make shoe removal a breeze from your throne of comfort.
Loosen Up: Straps and Laces Edition
Before you embark on the shoe-removal adventure, let’s talk about giving your shoes a bit of breathing room. Loosening the straps or untying the laces is like giving your Peloton shoes a pre-unwind stretch. It eases the tension and ensures your shoes are ready to slip off without a fuss. Think of it as a little act of kindness for your cycling companions. So, take a moment to give those straps a wiggle or untie those laces, and let the shoe removal festivities begin!
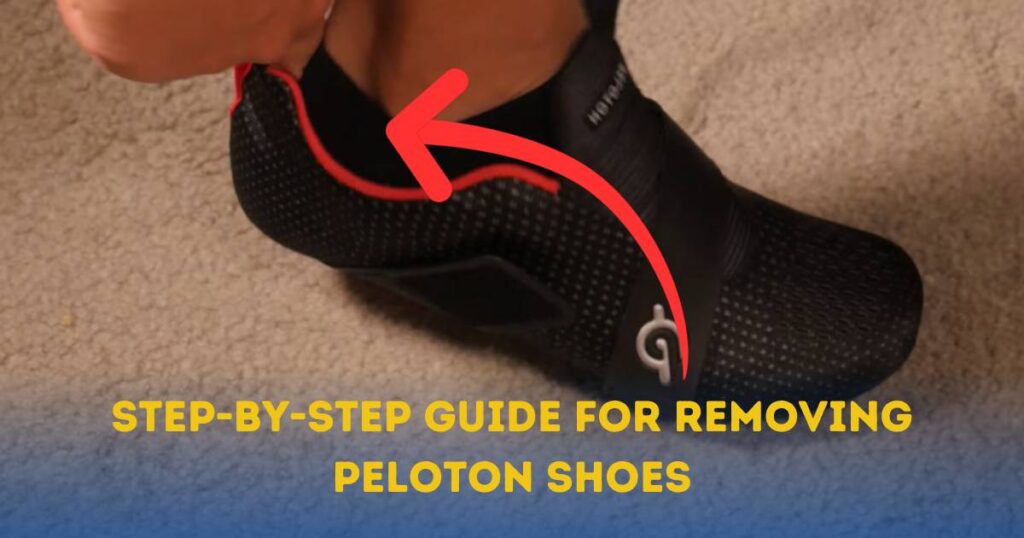
Step-by-Step Guide for Removing Peloton Shoes
Setting the Stage: Your Body, Your Comfort
Before we dive into the grand finale of unclipping those Peloton shoes, let’s talk about setting the stage – your body positioning. First and foremost, find yourself a cozy spot. Whether it’s a favorite chair or a stable bench, make sure you’re in a comfort zone. Remember, the goal is to bid adieu to your shoes without a struggle.
1. Take a Seat, Chillax!
Start by taking a load off – sit comfortably, kick back, and relax. You’ve just conquered a cycling session, and now it’s time for a well-deserved break. Feel free to use a stable support like a chair or bench. This not only adds an extra layer of comfort but also ensures you’re in control, and ready to tackle the next step of the shoe-removal adventure.
2. Ready, Set, Foot Positioning!
Now, let’s talk feet. To make life easy, position your feet for prime access to those Peloton shoes. It’s all about finding that sweet spot where you have the freedom to maneuver without any acrobatics. Get your feet in a comfortable stance, setting the stage for a smooth departure of those trusty cycling shoes. A little strategic foot positioning goes a long way in making the entire process a breeze. So, find your sweet spot, and let’s move on to the next step in this journey!
Mastering the Art of Freedom: Loosening Straps or Laces
Now, let’s zoom in on a crucial step in the Peloton shoe-removal dance – loosening those straps or untying the laces. It’s like giving your shoes a little breather before they take their final bow.
1. Loosening 101: Straps and Laces Edition
Let’s start with the straps. For shoes with straps, locate the adjustment point – usually a buckle or hook. Gently press or lift the mechanism to release the tension. If it’s a Velcro strap, simply peel it away. The goal here is to create a bit of slack without fully removing the straps. Now, onto the laces. For those with traditional laces, it’s time for a mini untying ceremony. Loosen the laces gradually, ensuring they’re not too tight across your foot. If your Peloton shoes have a dial closure system, turn it counterclockwise to release the tension. Remember, the key is to provide some wiggle room without fully undoing the straps or laces.
2. Embracing the Benefits: Smooth Sailing Ahead
Why go through the trouble of loosening those straps or laces, you ask? Well, it’s all about setting the stage for a hassle-free departure. Loosening provides your feet with a bit of extra space to slide out comfortably. It minimizes the struggle, reduces the risk of discomfort, and ensures a smoother exit from your cycling companions. Think of it as the warm-up before the main event – a little preparation goes a long way in making the entire process feel like a breeze. So, take a moment to show those straps or laces some love, and get ready for a seamless Peloton shoe-removal experience!
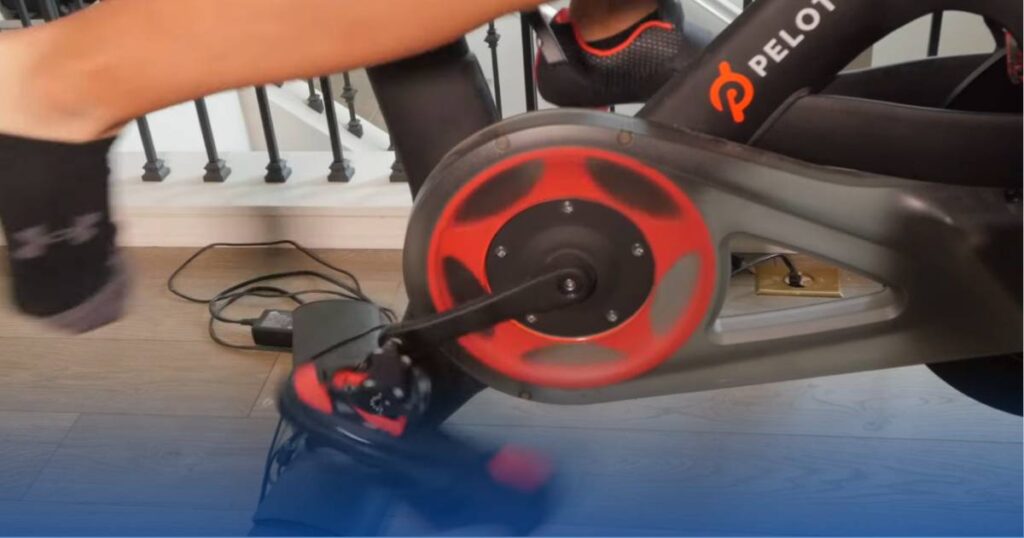
The Art of Liberation: Mastering the Peloton Shoe Removal Technique
Now, let’s dive into the main act – the actual removal of those Peloton shoes. It’s not just about pulling and tugging; it’s about finesse and a touch of technique to make the process as smooth as a well-oiled pedal.
1. The Grand Exit: A Step-by-Step Demonstration
As you sit comfortably or perch on your chosen throne (read: chair), here’s the step-by-step guide to gracefully bid farewell to your Peloton shoes:
- Relax and Unwind: Ensure your body is relaxed, and your weight is evenly distributed. Take a deep breath; this is about to get easy.
- Heel Lift: Start by lifting your heel slightly while keeping the ball of your foot on the pedal. This action disengages the cleat from the pedal.
- Slide Out Smoothly: With the heel lifted, slide your foot backward, away from the pedal. You’ll feel the cleat smoothly disconnect.
- Repeat with the Other Foot: Repeat the process with the other foot. Remember, it’s all about a gentle and controlled motion.
2. Tailoring to Your Shoes: Considerations for Different Models
Peloton shoes come in various shapes and styles, and while the basic technique remains the same, it’s wise to consider the specifics of your shoe model:
- Strap vs. Lace Closure: If your Peloton shoes have straps, ensure they are adequately loosened before attempting removal. For laced shoes, pay attention to any unique lacing systems and adjust accordingly.
- Dial Closure Systems: Some models may feature a dial closure system. In this case, turn the dial counterclockwise to release tension before lifting your heel.
- Bootie Style Shoes: If your Peloton shoes have a bootie-style design, be mindful of the snug fit. Gently ease your foot out, ensuring the bootie doesn’t catch on the pedal.
By tailoring the technique to your specific shoe model, you ensure a seamless departure, preserving the integrity of your Peloton shoes and setting the stage for your next ride. So, buckle up, follow the steps, and let the graceful shoe removal dance begin!
Navigating the Hurdles: Troubleshooting Peloton Shoe Removal
Alright, let’s talk real talk – sometimes, the Peloton shoe removal dance doesn’t go as smoothly as planned. But fear not troubleshooters; we’ve got your back. Here’s how to tackle common issues and ensure a drama-free exit from your cycling companions.
1. Tight Shoes and the Great Struggle
Issue: Your Peloton shoes feel tighter than a drum, making removal a Herculean task.
Solution: Loosen Up!
Start by checking the tightness of your straps or laces. If they’ve become snug during your ride, gently loosen them before attempting removal. Give your feet a bit of extra room to breathe, making the entire process more comfortable.
2. The Stuck Cleat Conundrum
Issue: Your cleats seem to have developed a bond with the pedal, and they’re not parting ways easily.
Solution: Rock and Roll!
If your cleats are feeling sticky, gently rock your heel side to side while lifting. This rocking motion helps break the bond between the cleat and the pedal. It’s all about finesse, not force.
3. Bootie-Bootie Blues
Issue: Bootie-style Peloton shoes are giving you trouble with their snug fit.
Solution: Gentle Persuasion!
For bootie-style shoes, gently ease your foot out, paying attention to the snug fit. If needed, use your fingers to guide the material away from the pedal. Take it slow, and your feet will gracefully make their exit.
4. Dialing Up the Tension
Issue: Your Peloton shoes feature a dial closure system, and it’s adding a touch of drama to the removal process.
Solution: Dial it Down!
If your shoes have a dial, turn it clockwise to tighten during your ride and counterclockwise to release tension before removal. This ensures a smoother exit without any resistance.
By addressing these common issues with a touch of finesse and some troubleshooting magic, you’ll breeze through your Peloton shoe removal routine like a pro. Remember, it’s all part of the cycling adventure!
Smooth Moves: Steering Clear of Common Peloton Shoe Removal Blunders
Let’s face it – we’ve all been there, struggling with our Peloton shoes like they’re an unsolved Rubik’s Cube. Here’s a heads-up on the typical slip-ups and how to gracefully sidestep them for a drama-free exit.
The Slippery Slope: Common Removal Mistakes
Mistake 1: Abrupt Pulling and Tugging
Some folks get a little too enthusiastic, pulling and tugging their Peloton shoes like they’re trying to win a wrestling match.
Mistake 2: Neglecting Cleat Disengagement
Forgetting to disengage the cleats properly before attempting removal is a classic mistake. The cleats and pedals need a clean break to let your feet go.
The Consequences: Why It Matters
Consequence 1: Potential Damage to Shoes
Abrupt pulling and tugging can strain the shoe material, compromise the integrity of the straps or laces, and even lead to visible damage. Your Peloton shoes deserve better.
Consequence 2: Struggle and Discomfort
Neglecting proper cleat disengagement can turn a smooth removal process into a battle. Your feet might feel trapped, leading to unnecessary discomfort and frustration.
Navigating the Right Path: Avoidance and Correction Tips
Guidance 1: Gentle, Controlled Motion
Instead of yanking your Peloton shoes off, opt for a gentle and controlled motion. Lift your heel, slide your foot back smoothly, and let the cleats disengage naturally. It’s a dance, not a tug-of-war.
Guidance 2: Prioritize Cleat Disengagement
Before even thinking about removing your shoes, ensure the cleats are disengaged from the pedals. Rock your heel slightly side to side to confirm the separation, and then proceed with the removal. It’s a small step that makes a big difference.
By steering clear of these common mistakes and embracing a more finesse-filled approach, you’ll be gliding out of your Peloton shoes like a pro. Your feet will thank you, and your shoes will stay in top-notch shape for the adventures ahead. Happy cycling!
FAQ
Yes, the technique for removing Peloton shoes remains similar, but it’s essential to consider the specifics of your shoe model. For example, adjusting dial closures or being mindful of the snug fit in bootie-style shoes.
Removing Peloton shoes correctly ensures a comfortable post-ride experience and helps prevent potential damage to both the shoes and your feet. It’s a key step in maintaining the longevity of your cycling gear.
Conclusion
As we wrap up our Peloton shoe-removal saga, let’s take a moment to recap the key takeaways from our shoe-unclipping adventure. We’ve learned the art of finesse in removing Peloton shoes, steering clear of common blunders like the tug-of-war, and neglecting cleat disengagement. Remember, it’s all about the smooth moves and treating your cycling companions with the love they deserve.
Reiterating the Importance: Happy Feet, Happy Ride!
Proper shoe removal isn’t just a post-ride formality; it’s the icing on the cycling cake. By adopting the right techniques, avoiding common mistakes, and showing some finesse, you’re not only ensuring a positive Peloton experience but also extending the lifespan of your trusty shoes. Happy feet lead to a happy ride, and that’s what we’re all about!
Your Peloton Shoe Chronicles
We want to hear from you, fellow riders! Share your Peloton shoe removal triumphs, funny anecdotes, or even the occasional oops moments in the comments below. Let’s create a space where the Peloton community can swap stories, tips, and tricks. Have questions? Drop them here too! Your experiences might just be the inspiration or guidance someone else needs. So, saddle up, share away, and keep those pedals spinning. Until next time, ride on